Pages

Ads 468x60px

Saturday 2 November 2013

How to add subtitles to AVI video

If you want to add subtitles to AVI video or convert any formats to AVI with adding your customized subtitles, this tutorial will show you the detailed steps to add subtitles to AVI video with WinAVI All In One Converter.

Step 1: Free download WinAVI All In One Converter. Prepare your edited subtitles or you can also directly download subtitles from Internet .The popular file extension of subtitle formats are .srt and .ssa. You can easily see the contents of the subtitle through any text editor such as notepad.

Step 2: Please put your .srt or .ssa subtitle file into the same folder with movies you want to convert together.

Setp 3: You must rename the .srt or .ssa file to match the original video name. Make sure the subtitle name set as"file name. language.srt/ssa". For example, If you want to add a subtittle into an English movie such as "Shrek", you should set your subtitle as "Shrek.en.srt" or "Shrek.en.ssa". In this process, please also distinguish the capital and small letter.

input file and add subtitles to avi - screenshot

Step 4: If WinAVI program is running, please shut down and restart it. Then load your video and set AVI as output format. When video file has been loaded, click"Advanced" and enter the "Decoder" Menu, a "subtitle stream" option will be showed for you to select your edited subtitle.


choose wanted subtitles on decoder menu - screenshot


Step 5: You can also set other advanced options and then just click the green "start" to convert when you finished all the settings. After conversion is complete, you can click "open the output file" to find your converted AVI File that has been adding your wanted subtitles.

Buy WinAVI All In One Converterfree download WinAVI All In One Converter

How to merge subtitle to mp4

MP4 is a multimedia container format standard specified as a part of MPEG-4. It is most commonly used to store digital video and digital audio streams, especially those defined by MPEG, but can also be used to store other data such as 
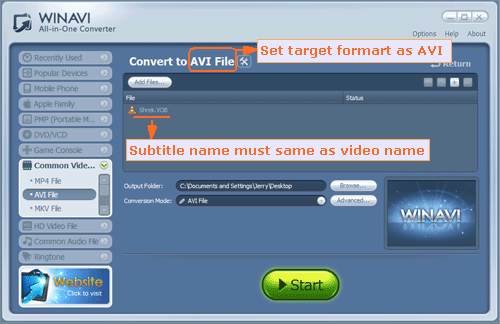
subtitles and still images.
SubRip caption files are named with the extension .SRT. SRT is perhaps the most basic of all subtitle formats. This format is supported by most software video players and subtitle creation programs. The time format used is hours:minutes:seconds,milliseconds, with the milliseconds field precise to three decimal places.
You can Merge .srt subtitle to mp4 ,become part of mp4 video.

Click http://www.watermarksubtitlecreator.com/down/VideoWatermarkSetup.exe to download and install
Video Watermark Subtitle Creator and install to your PC.

Step1
.Launch Video Watermark Subtitle Creator, you will see the following main interface.
 Click Add ,you can import one or more mp4 video clips into list.
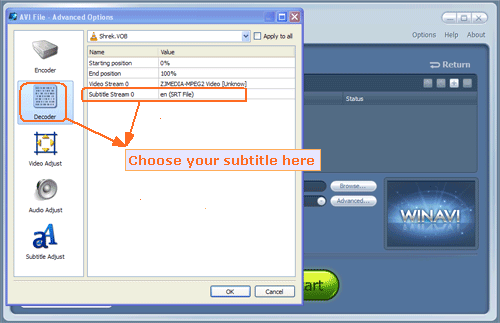
Step 2:merge .srt file to mp4 movie.
Select "Subtitle" tab,and Click "Open" button. You can add .srt file in mp4 movie and configure output format to mp4.
Step 3:Sets the subtitle style
Click "Edit" button ,Ok, go on please. click

Step 4:preview at design time, so the video’s watermark and subtitle effects can be previewed at any time without conversion.
Click play(preview) ,and than click .


Step 5:Ok, Click Run


Tuesday 18 December 2012

Can’t Change Date and Time in Windows 7


I recently ran into a problem on one of my Windows 7 machines where I could not change the date and time. Every time I clicked on the Change Date and Time dialog box shown below, I kept getting an error message.
change date and time
The message that kept popping up was:
Unable to continue. You do not have permission to perform this task.
I had previously had some problems with this machine and thought it might be related. In the end, I had to try a couple of different solutions before I stopped getting the error message about not having permission. Hopefully, one of the solutions will work for you.

Method 1 – Safe Mode

One thing you can try is to change the date and time in Safe Mode. If you are able to change it here, you then know it’s a problem with either a startup item or a Windows service. You can then perform a clean boot of Windows 7 to narrow down the issue.
You can check out this article from Microsoft that details how to perform a clean boot in Windows 7:
http://support.microsoft.com/kb/929135
clean boot

Method 2 – System File Checker

The next thing you can try is to run the system file checker. If you’re having strange permission issues in Windows, it’s probably some type of corruption of system files and settings. You can run SFC by opening a command prompt and typing in the following command:
sfc /scannow
sfc scannow
System file checker will verify all system files and will replace any file that is corrupt, modified or damaged.

Method 3 – Command Line

You can also change the date and time in Windows using the command line. Open a command prompt and type in the word date and press enter. You’ll be prompted to enter a new date.
new date
What about the time? Pretty easy too. Just type in the word time and you can change the time too:
change time
Note that the time is in 24-hour format and you can specify it down all the way to milliseconds. You should be able to change the time without having to open an elevated command prompt. If you get an error, however, then try running the command prompt as Administrator.

Method 4 – Local Security Policy

If you get an error message like “A required privilege is not held by the client” when trying to use the command prompt, go to Control Panel, Administrative Tools, Local Security Policy and then navigate to Local Policy\User Rights Assignment and ensure that Change the system time and Change the time zone privileges are given to Administrators.
local security policy
Note that if you are in a domain, you may simply be restricted by the group policy set by your company. If you’re not on a domain and Administrators don’t have the two privileges shown above, then adding the group to the security setting should fix the problem.

Method 5 – Windows Time Service

If you’re still having problems changing the date and time in Windows, go to Control Panel, Administrative Tools and click on Services. Scroll down to Windows Time and right-click and choose Properties. Click on the Log On tab and make sure it’s set to This account – Local Service.
windows time service
The password fields should automatically be filled in, so there is no need to type in any passwords. Go head and restart the computer and see what happens.

Method 6 – Uninstall Third-Party Clock Applications

If you have any third-party clock manager or time programs, go ahead and uninstall them and see if that resolves your issue with changing the Windows date and time. Sometimes a conflict can occur and a third party program might prevent you changing the time.

How to Hide a User Account in XP

You can hide a user account from the Welcome screen in Windows XP, but it requires editing the Windows registry. Unfortunately, there is no easy way to do it unless you use a third party application. I’ll explain both ways in this article.
Note that when you hide a user account in Windows XP, it’s better if you are running Windows XP Professional rather than XP Home edition. Why? Well, once you hide an account, it will no longer show up on the main login screen, so how do you access it?
welcome screen xp
Well in XP Pro, you can press CTRL + ALT + DEL twice to get the old Windows 2000 login box and type in the user name and password to access the hidden user account. But if you have XP Home, this trick does not work and the only way to access your hidden account is to start the computer in Safe Mode, which is major pain if you want to use that account often.
So before doing this, make sure you are running XP Pro otherwise you will not have normal access to your account.

Hide User Account in XP

Step 1: Open the Windows Registry editor by clicking on Start, then Run, and typing in regedit.
Step 2: Navigate the the following registry key:
HKEY_LOCAL_MACHINE\SOFTWARE\Microsoft\Windows NT\CurrentVersion\Winlogon\ SpecialAccounts\UserList
hide user account xp
Step 3: Now right-click on UserList and create a new DWORD value and name it exactly what the user name you want to hide is. For value, give it a value of 0. 0 Means hide the user account and 1 means show the user account.
As you can see from below, I added “Aseem Kishore” to the UserList as a new DWORD key with a value of 0. Make sure that the name you enter matches exactly with the user name displayed on the Welcome screen. So if you want to hide the Administrator account, type in “Administrator”, etc.
hide user name xp
Step 4: Close the registry editor and reboot your computer. Now press CTRL + ALT + DEL twice and you should be able to type in the user name and password to access the hidden account!
You can also download a free program from IntelliAdmin that will do the same thing for you, but make it much easier. Scroll all the way down to the bottom and you’ll see a link for the program.
xp user hide
It’s called XP User Hide and you can simply check off which user accounts you want to hide and it will modify the registry for you. You can learn more about User Acounts in Windows here

Device Manager empty or blank in Windows

I recently had a problem where I opened my Device Manager and found that is was blank! Nothing there! Just plain empty! It was very strange and it took me a while to figure out what the problem was!
If your Device Manager is completely blank or empty, then there are two possibilities of why the problem is occurring: either you have a critical Windows service disabled or your permissions in the registry for the Device Manager key are corrupt.
Here’s how you can fix this issue by enabling the appropriate Windows service or changing the permissions in the registry.

Method 1 ““ Enable Plug and Play Windows Service

Apparently, the Windows Device Manager needs to have the Plug and Play service Enabled in order to work correctly. You can enable the service by going to Start, Control Panel, opening Administrative Tools and then clicking on Services.
windows services
Scroll down and find the Plug and Play service. Double-click on it and make sure the Start up type is set to Automatic and click Start if the service is not running.
plug and play windows service
Check to see if your Device Manager is still blank or not. If it is, then you can also try to enable more Windows Services by going to Start, Run and typing in MSCONFIG. Click on the Services tab and choose Enable All.
enable all windows services
Go ahead and restart your computer and you should now hopefully be able to see all the hardware devices in Device Manager. If not, try Method 2!

Method 2 ““ Edit the registry permissions

The other reason Device Manager may be empty is because there are security issues with the key in the registry. To fix it, click on Start, then Run, and type in REGEDT32. Click on the HKEY_LOCAL_MACHINE window or expand that hive and navigate to the following key:
HKEY_LOCAL_MACHINE\SYSTEM\CurrentControlSet\Enum
Now right-click on Enum and choose Permissions. If the Group or user names list box is empty, then you know this is the problem! It should have two names in there, System and Everyone.
Click the Add button and type in Everyone and click OK. Check the Allow box next to Read for Everyone. Now click Add again and type in System. Check the Allow box next to Read and Full Control for System. It should look like this:
enum registry permissions
Both the check boxes under Allow should be selected when you highlight System. Also be sure to click on the Advanced button after adding both users and selecting Reset permission entries on all child objects with entries shown here that apply to child objects.
replace permissions on child objects
Click OK and if a warning message comes up, just click OK. Close the Registry Editor and restart your computer. You should now be able to see everything in the Device Manager.

Fix “You need permission to perform this action” error

Microsoft should have just not released Windows Vista rather than making us bear the pain of trying to use a crappy operating system. Or at least very annoying. Problems I never had in Windows XP now show up all over Vista.
One of those annoying problems is the fact that security on Windows Vista is so tight that half the time you are allowed to do normal activities! For example, there are numerous times when I am trying to perform a simple task in Vista like install a program and I end up with the following message:
You need permission to perform this action.
Why do I need permission when I already agreed to it when the other annoying UAC dialog popped up and asked me about it! Strange thing is that even if you are an Administrator, there are certain tasks or actions that Windows locks down.
you need permission to perform this action
The best part is that you do not get this error on any kind of consistent basis, it can pop up when you are trying to delete a folder, trying to copy some files, trying to install a program, etc, etc. It all comes down to not having the right security permissions.
Note that UAC (User Account Control) does not usually affect this problem, so don’t go out and automatically disable UAC. If you disable UAC, you can’t do things like share printers, etc, so it’s best to live with it.
There are some things you can do, however, to help out with the “You do not have permission to perform this action” problem though. If it’s a particular file or folder you are trying to delete, you can simply give yourself full control permissions over the file.
But before we go into that, try one other method that might be a bit faster. Go to Start, Programs, Accessories, and right-click on the command prompt and choose Run as Administrator.
run as administrator command prompt
Now at the command prompt type the following command:
net user administrator /active:yes
Press Enter and restart your computer. Now try to perform the task again that gave you the “You do not have permission” error. If that does not work, then follow the steps below to change the file permissions.
To change the security permissions for a file, right-click on the file and go to Properties. Then click on the Security tab.
file security permissions
Now click on the Advanced button at the bottom and click on the Owner tab.
owner security tab
Click on the Edit button, click Other users and groups and type in your user account name and click Check Names.
select users and groups Image Source: Vista4Beginners
Click OK and on the Owner tab make sure to check the “Replace owner on subcontainers and objects” box. Now select your user account from the list on the Security tab and click Edit. Click Allow next to Full Control and click OK.
full control
Hopefully, this fixes one very annoying problem with Windows Vista. I did notice that upgrading to SP1 helped to reduce the occurrence of this error, so if you do not have SP1 installed yet, make sure to go to Windows Update
Related Posts Plugin for WordPress, Blogger...
trickstipsall4u.blogspot.com Webutation
MyFreeCopyright.com Registered & Protected

M

ad

Contact Me

flagcounter

free counters